The basement stairs project was this past weekend and it ended up being a complete success. Angela and I are both really happy in how they turned out. I don’t really want to write a play by play, but I thought I would at least write some about what we did and what all I learned.


Johnny and I had purchased all the lumber and planned out what we’d do the previous weekend, which helped save some time and energy for really getting down to the business of building. My biggest worry and the main reason I had put off doing this for so long (I’ve been talking about these stairs since the first day we moved in) was that I knew it would be very important to replace them in a single weekend. If I couldn’t finish before Monday morning, I’d end up going several days with no stairs (inside) down to the basement: where the laundry is. That would mess up the flow of things around the house and be otherwise pretty dangerous. So, doing all the planning and materials purchasing in advance made a big difference and I’m going to try and spread out my projects similarly in the future.
")
Demo didn’t really take very long. I probably took longer to haul all this up at the end of day one.
We got started about 9:00 am on Saturday and surprisingly, demolition of the old staircase took less than 30 minutes. The entire thing was connected to the structure of the house by no more than four 10d nails. Two of which were nailed upwards into the framing from below such that weight on the stairs tends to just pull them right back out, which is exactly what had happened. So, in reality, for the past 68 years, two toe-nails have been keeping this whole assembly up. As an engineer, I can tell you that there’s really no mathematical reason for that to actually work. Dumb luck and some sort of wedging friction combined to prevent anyone from being seriously hurt for far longer than is really sensible.
Even though it stretches what the building code allows for, we used one of the existing stringers as a template to cut the three new ones by. This saved us loads of time and headaches. Those stringers weren’t perfect (and at 42.8°, really steep), but they were fairly regular and square. I drilled the corner at each tread-to-riser intersection to help cut down on over-cut. We just used a circular saw and a jig saw to cut the entire set of stringers and paid close attention to getting everything right. We ended up with all the framing members cut and ready to hang by around lunch-time.

Base connection detail
The next step was the bottom support assembly. I decided to use a fence-post base that had a threaded rod for height adjustment. This would provide a really solid base connection, something substantial to frame everything into, and most importantly, would allow us to raise the whole base up off the wet basement floor. Of course, this required drilling holes in the concrete floor slab to accept the anchor bolts. I bought a 3/4″ ∅ bit for just this purpose but we quickly discovered (actually about 15 arm-numbing minutes and 1/2″ later) that my hammer drill simply wasn’t powerful enough to drill that size hole 3″ into concrete. We went over to the hardware center to rent a real drill: a Hilti commercial hammer drill. The least amount of time they’ll rent one is four hours. We drilled the two holes in about three minutes. It actually took longer at the rental counter than it did to do the work. Money well spent, in my opinion. The “epoxy” I used was actually a Simpson acrylic adhesive specifically for this application. It is fast setting (less than 25 minutes at room temperature) and will likely survive a direct nuclear strike on the house.
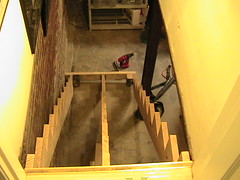
Framing complete
After getting all the framing work assembled, we called it a day. We spent a lot of time fitting everything up before final assembly and although that (along with two trips to pick-up and return the drill) burned up our afternoon, it paid off in having everything fit together well once we did start hammering nails.

Rounded stair tread detail.
The next morning, we started to work on the treads and risers. Johnny had brought over his router and was able to add a nice rounded edge to all the tread nosing. That is the sort of stuff you’ll actually notice when you look at the stair and even though it probably added an hour or so total, it was time well spent. The final result is a really great looking set of stairs that we were able to walk up for a late lunch around two o’clock.

Handrail connection detail.
We visited our friend David’s house to borrow his miter saw to cut the ends of the handrail plumb. Again, just detailing for aesthetics, but the end result looks much nicer. We spent the remaining time put the handrail up. The first part of that was to build an assembly onto the steel column at the base of the stairs. We used a step bit to drill into the steel flanges to accept three lag-screws. This took a lot less time than I had figured on and the end result looks nice and is incredibly solid (oh yeah, be sure and use cutting oil or you’ll probably just end up welding the bit into the steel). The rest of the handrail surprised us by just how difficult it was to mount. Finding wall studs in a heavily plastered wall is nearly impossible, but we managed to only drill a couple of extra pilot holes. It was the oak handrail itself that was the biggest trouble. After two days of working with relatively soft Southern yellow pine, that oak was like trying to drive a screw into steel or concrete. Actually, worse since both of those went much faster! We did manage to get everything together just in time for when Angela arrived back home.
I finished up the light I installed in the stairwell and now I just need to do some final cleaning up. All in all, a great weekend project. I owe Johnny O. a great deal, as I couldn’t have done it without him. Here’s my idea for a credit card commercial, by the way:
- Lumber and materials: $230
- Hardware and tools: $65
- Equipment rental: $42
- Having a friend who actually wants to help build a staircase: priceless.
Looks great J… Very impressive… I would of loved to help had I been around… You know how good I am at installing microwaves…
‑dc
I’d have loved to have you lend a hand, too. We’ll find some project to work on next time you visit. That’s one of the joys of home owning: always something to work on.
Looks great, Jason!
I’m glad I came across this, this is exactly what I want to do in my house.
I’ve been scouring the internet looking for examples, wondering if it’s something that I could do myself, or not.
I’m curious if you had any actual plans for this, or did you just figure it out on your own?
I don’t have a construction background but I’m fairly handy around the house.
I do have friends who are more familiar with construction but haven’t built stairs.
Any advice?
Thank you.
Well, Joe, I’m a structural engineer in my day job and my friend I mentioned is a handyman/ amateur carpenter. That, plus the fact that I work with two very smart structural engineer/ woodworkers helped to give me a bit of a leg up. However, all that being said, none of us had ever built any stairs before so it’s not like we’d had loads of experience. I had been thinking about the layout for these for sometime, and really just designed them all on my own. Unfortunately, there’s just not a lot of information out there for rough stair carpentry (as you’ve probably found).
I’d say the best advice would be to use your existing stair stringers as templates, provided you can live with their rise/run. Cutting accurate stair templates is one of the toughest challenges in carpentry, or so I’m told. We skipped this all together and the project was a lot smoother as a result, I’d say. Also, do not over cut the stair treads on your stringers. Use a drill on the corners and a hand jig-saw to cut what you can’t get with a circular saw. I see a lot of over-cut stringers in my line of work and all of those stairs are flimsier than they should be.
Use as beefy (deep) of stringers as you can fit into your application (I used three 2“x12“ ‘s for this staircase). Spend a little more money on these and you’ll have a much stiffer staircase. Walking down a flight of stairs puts a fair amount of dynamic load into them and people are very sensitive to that. It’s more of a comfort and performance thing than anything else, but it’s really worth doing. Also, use pre-drilled deck screws to hold down the treads. They won’t squeak so much over time. Plus, since we used three stringers instead of two, they allowed us to warp the treads ever so slightly to account for imperfections in the center stringer (imagine that the three points weren’t perfectly in line, as they almost always are not).
Good luck with your project! Once your done, and feel like posting some photos or a blog post of your own, feel free to drop a link back here. I’d love to see what you come up with.
Hello,
We poured the floor with steel joyce and afterwards decided to use the basement.
The joyce are horizontal 2ft apart so I want to cut one giving me 4ft for the well or opening from the basement to the first floor.
Do you know how do I support or make up the stairs.
Thanks
Minnis
Minnis: I’m sorry but I don’t really understand exactly what you are describing there. However, if you are considering altering the structure of you home you should consult a local structural engineer or architect for advice. It’s time and money well spent.
I was just wondering what and how you connected the upper portion of your stringer too. I have a similar project coming up and it would be nice to know. By the way your stairs look great.
Hi, I am very impressed on you r handywork and precision. I am on total disability now and have had go go into a leg brace on my right leg. My basement stairs are currently 38 inches wide with a depth of 9.5 inches. I currently have to turn my whole body sideways to walk down or up because my foot with the brace will not fit on the step. I would like to make them deeper and was trying to find out if I could just build out from the current staircase. I have been quoted from one contractor for complete demolition and new staircase of $2200 which is of course just way beyond my current budget. Any helpful ideas you could offer me?
Sincerely, Kathy
Since you had so much fun doing your I would love help. I have basement steps and want to flip the direction I think I can do it but it is nerve racking
How do you attach the top of the stairs to your home
Allen: The top of the stairs were attached with some Simpson hangers, which are available at most any hardware store. Consult some knowledgeable staff, the Simpson catalogs, and a local structural engineer if you have anything ‘out of the ordinary.’
Kathy/ Allen: Both of those sound like fairly major renovations, not just like-for-like replacement such as what I’ve described above. The best advice I can give you both is to befriend a carpenter & handyman and/or a structural engineer.
As I make very clear elsewhere on this site: I do not provide any structural engineering services outside of my employer.