As our kids have gotten older, they have outgrown their shared hallway bathroom. So we decided to give them two sinks and some more storage space.
In all fairness, “renovation” is probably not the best word for this project. We didn’t exactly tear down the room to bare studs or anything. However, it did touch on just about every DIY skillset I have! And we agreed that if we were going to do this project ourselves and not hire anyone, we were still going to make sure every aspect was done right.

We used a similar IKEA cabinet with drawers to the one we installed in our downstairs bath update. This is the IKEA Hemnes vanity and wall cabinet, along with the match Odensvik sink. We also used a pair of the Ensen faucets from IKEA. These cabinets are great for storage but be prepared to do some modifications to your plumbing lines as they almost certainly will have to be cut shorter!
However, where that had a pedestal sink, this bathroom had a full cabinet with a closed base. The new cabinet was shorter in depth and also had an open cabinet. Upon pulling out the old cabinet, we immediately realized that the tile was place after the cabinet and therefore didn’t continue beneath it. Angela was able to locate some matching tile used in the bathroom. We had to remove some of the tiles that had been cut around the cabinet footprint. A grout removal blade on a cordless oscillating multitool made this an easy job (I started off trying to remove the grout by hand and it was nearly impossible with the epoxy grout). My son helped out placing some underlayment. The composite vinyl tile used floor adhesive and silicon grout (which is honestly way worse to place than normal tile grout). We were able to mostly match up the grout, though.

Removing old tile around cabinetry 
Wyatt helps attach the new subfloor 
Last piece of new tile being glued down
For lighting, I added a second light mount in series with the original. The builders of this home used possibly the worst light mount boxes, so I ended up replacing the original with an old work box. I drilled through a couple of studs to run the wire, which was difficult at best1. The other electric work consisted of moving an outlet a few inches out of the corner so that it wouldn’t be blocked by the wall cabinet. I used my multitool again here to quickly cut out the old box and then cut in a space for an old work box about 5″ to the left. Seems like a lot of effort for not much distance, but it makes the outlet much easier to get to.

Drilling through a stud for lighting (into a live cable!) 
Electric done and wall patched 
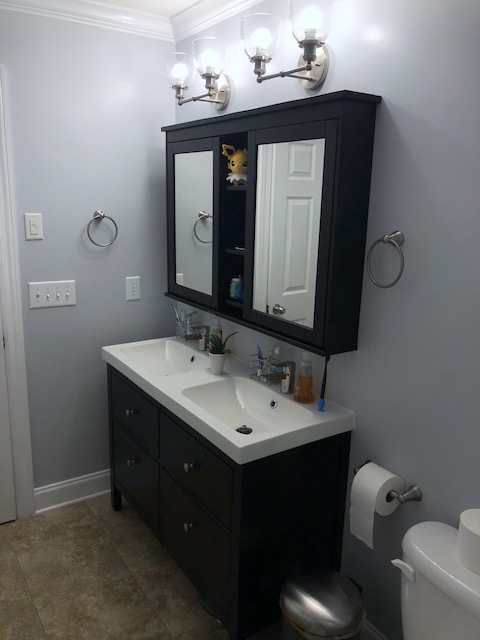
Lighting and paint completed
With the electrical out of the way, it was time to patch up the walls. I’ve learned a bit about drywall repair and I can say from experience that drywall compound is far better to work with than spackle for anything larger than a nail hole. For covering larger openings, also use a metal mesh patch. The one downside to drywall compound is that it’s a ton of sanding and therefore a huge, dusty mess. But the results are worth it. My wife and daughter painted the room a blue-gray once all the sanding was complete.

Next, it was time for plumbing. Unlike our downstairs bath, the supply lines and drains in the wall stuck out too far for the IKEA cabinets. In order to cut back supply lines, we had to shut off the main water supply to the house. We had fortunately never had to do that before so locating it was a headache. In our defense, it’s upstairs in a hall closet where our water heater tank is located and doesn’t look like any other water shut-off valve I could find on the internet! Once we got the water shut off and the pipe pressure relieved by opening a tub faucet downstairs, I could cut the lines. Actually, Angela ended up cutting the second and putting a new shut-off valve on since I had to run to the store to get some more compression rings (the old ones weren’t coming off and I only had one for some reason). The drain was easy to cut back using the multitool again (it’s a great demo tool!). I installed the line splitters and fit up all the drain lines for the two sinks after that.

Building the sink drains 
Drains and sink lines complete 
Tight fit behind the drawers in this IKEA vanity
The open cabinet meant that I needed to place floor trim all along the wall where the old cabinet previously was. I was able to purchase some matching MDF floor molding and shoe molding. I cut it to size, sneaking up so it would make a nice, tight miter in the corner. Of course, the walls were not really straight at all. The one new tool major tool I purchased for this project was a battery powered trim nailer and it made installing the molding a breeze. With that in place, we could hang the cabinet and set the vanity top.

The last thing to do was to hang the wall cabinet with the mirrors. Unfortunately, both Angela and I hadn’t really thought through all the distances. There was enough space for the full cabinet between the top of the faucets and the bottom of the light fixtures, but just barely. That is, you wouldn’t actually be able to put your hand on the faucet and turn it on! We even tried turning the lights to point up (keen eyes may have noted that in the first photo), but it still wasn’t going to be enough space for the wall cabinet.
I had a plan, though. I took the wall cabinet apart and did some a lot of measuring. I then took the sides and back panels out to the garage workshop. I was going to simply remove the bottom shelf and thereby shorten the cabinet 6–1/2″. The sides were actual stained pine, so I didn’t have to worry about a veneer tearing too much. I made the cuts to length using the miter gage. I then cut about the final inch off of those off-cuts. This would give me a drill template for the dowel and screw holes in the “new” bottoms. I then cut the back panels down by the same amount. The cabinet went back together perfectly. There was even a consistent gap all around the mirror doors!
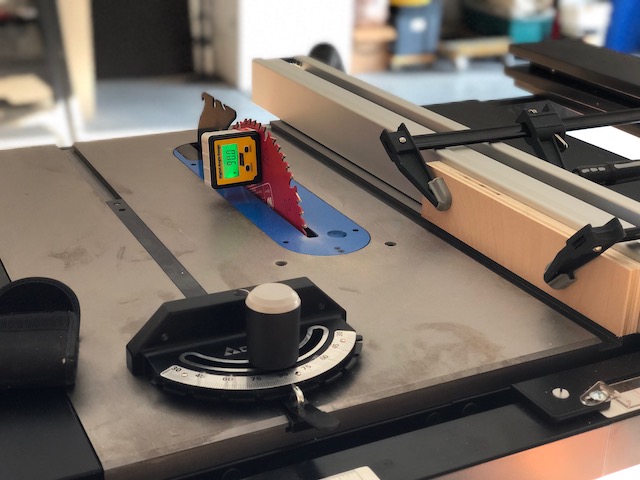
Setting up for some cross cuts using the miter gage 
Drilling new joint holes for screws and dowels using the cut-off as a drill guide 
Cut-off clamped in place
The last major piece to install was a new toilet. The old toilet was a short height, round bowl (i.e., a “kiddy” size toilet — this photo does not do the size difference justice). We opted for a reasonably priced Delta toilet. I was a bit nervous about the removal and installation, but it went pretty easily and was far less unpleasant than I expected. That being said, the Delta toilet is pretty lousy and I wouldn’t recommend it to anyone.

We hung up some matching hand towel and robe hooks for the kids to finish off the room. So there you have it: demo, tiling, electrical, plumbing, drywall, painting, and carpentry all in one small bathroom renovation! But it really has inspired our confidence to tackle even more projects. I’m pleased with how everything turned out and that I know everything’s done correctly, too.
- In fact, I nearly drilled right into a live 110v line to an outlet using a spade bit. Fortunately, I was going fairly slowly. However, that could have easily gone very badly for me. [↩]