I made some small tablet/phone stands as Christmas gifts for family. Though they’re relatively simple, making a dozen of the exact same piece required thinking ahead.

Stamped Stand 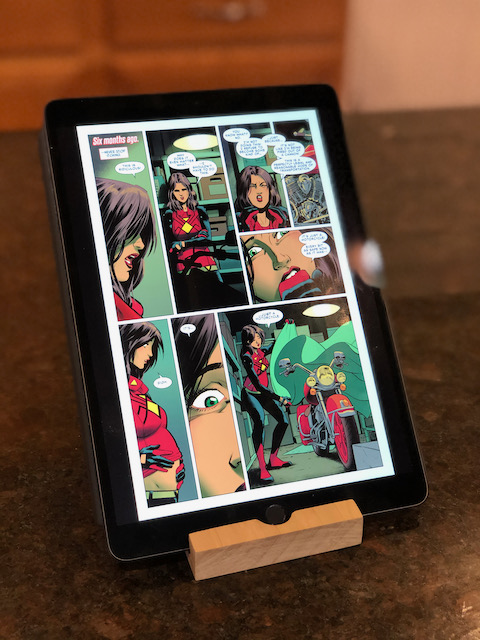
Tablet Stand
I used a 7′ (-ish) section of 1x4 poplar from the Home Depot. This was S4S lumber, so it was a good piece to start with. I didn’t have to do any milling (which is good, because I don’t have any real milling tools). I initially cut a few short sections on the miter saw to make a few prototypes. I did a few different slot angles and widths, finally landing on a 3/8″ at 10°. The through hole is mainly to help access the home button (or swipe up gesture) when the tablet is upright.
For batching out the remaining dozen of stands, I needed to think through the process to set up repeatable actions for each step. While the miter saw is perfectly capable of making repeatable length cross cuts, I ended up just using the table saw in order to reduce my cleanup time (the dust collection on my table saw is much better and I was already going to use it for the slots).

I then glued up a couple of pieces of scrap to make a jig for drilling out the through hole. This didn’t work out as well as I hoped and I ended up having to just manually align the holes. Cutting them with a forstner bit was at least fast, though. I’ll definitely re-visit that drill press jig if I make more.
Next came cutting the angled slot, which is the only really tricky part of this project. I set my table saw blade at 10°. Now, it doesn’t matter what table saw blade I use, because no blade can cut a flat bottom when angled like that. So I have to cut about 5–6 passes and then have some ridges along the bottom of the slot.
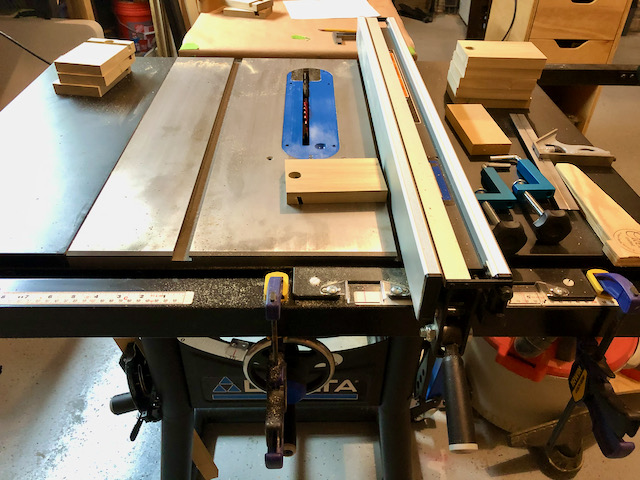
To set the bounds for the edges of the slots, I added a couple of quick clamps on to my table saw fence gage to act as stops. Then I just needed to move the fence over just shy of an 1/8th of an inch for each pass until I hit the far stop. I also used my MicroJig Gripper to help hold the pieces. As you can see, the length of the piece between the blade and the fence is more than the width of the piece parallel to the fence. This is generally not a safe cut, but with such a small piece, it not being a through cut, and using the Gripper, I felt completely comfortable making these cuts. After making the cuts, I could use a 1/4″ chisel to clean up the uneven bottom of the slots.

Next came sanding. I sanded each piece through 120, 220, and 400 grit sandpaper. As these are very small pieces, I had to hold the piece in one hand and “air” sand it using the random orbital sander. To say the least, this was exhausting trying to hold vibrating pieces together! I then used my old nemesis, the disc sander, to sand a chamfer onto each edge. I set the table at 45° and made a quick pass along each edge. Keep in mind, each of thee blocks has 12 edges and there were a dozen blocks. That’s a long of sanding. At least I got through listening to a majority of my audiobook doing all this receptive cutting and sanding.

It’s during these sort of repetitive actions that it’s very easy to get complacent, which can lead to injury with power tools. Having my minor injury at the end of 2019 and then seeing very competent YouTubers get hurt, I was very aware of this fact. Even Adam Savage has talked about the risk of injury during these sort of repetitive actions. So I did my best to keep my wits about me and pay attention to every cut and every pass with the sander.
I finished each of these with a couple of coats of spar urethane (after stamping the bottom of each). I then gave each a quick knock-down sanding with a sheet of 400 grit sand paper. The finish is glass-like and should hold up to kitchens, bathroom counters, coffee mugs, etc.